مجموعة نظام السقف FOMEI - دليل مستخدم PhotoRobot
يصف هذا الدليل المكونات الرئيسية وإجراءات تركيب نظام مصابيح السقف السقفية FOMEI السكك الحديدية. تهدف المعلومات إلى دعم عملاء PhotoRobot في تركيب نظام السقف لتركيب فلاشات وأضواء الاستوديو الاحترافية ل PhotoRobot. يتضمن نظرة عامة على جميع المكونات الرئيسية، وخطوات التركيب لنظام السقف FOMEI مجموعة 1 (3 × 3 أمتار)، والمجموعة 2 (3 × 5 أمتار)، والمجموعة 3 (5 × 5 أمتار).
ملاحظة: هذا الدليل التجميع هو نسخة مكررة من وثائق FOMEI الرسمية. PhotoRobot وFOMEI شريكان منذ زمن طويل لضمان التميز في إضاءة المنتجات لأنظمة التصوير الفوتوغرافي الآلية من PhotoRobot. للحصول على النسخة الرسمية القابلة للتحميل بصيغة PDF من الشركة المصنعة، يرجى الرجوع إلى موقع FOMEI Lights & Photography.
مهم: قبل التشغيل، تأكد من أن المنتج سليم وعدم وجود أجزاء مفقودة. إذا كان هناك أي عيب، يرجى التواصل مباشرة مع FOMEI. للحصول على معلومات الضمان والصيانة لمنتجات FOMEI، راجع الوثائق المقدمة خصيصا لجهازك.
PhotoRobot - إعداد نظام السقف FOMEI
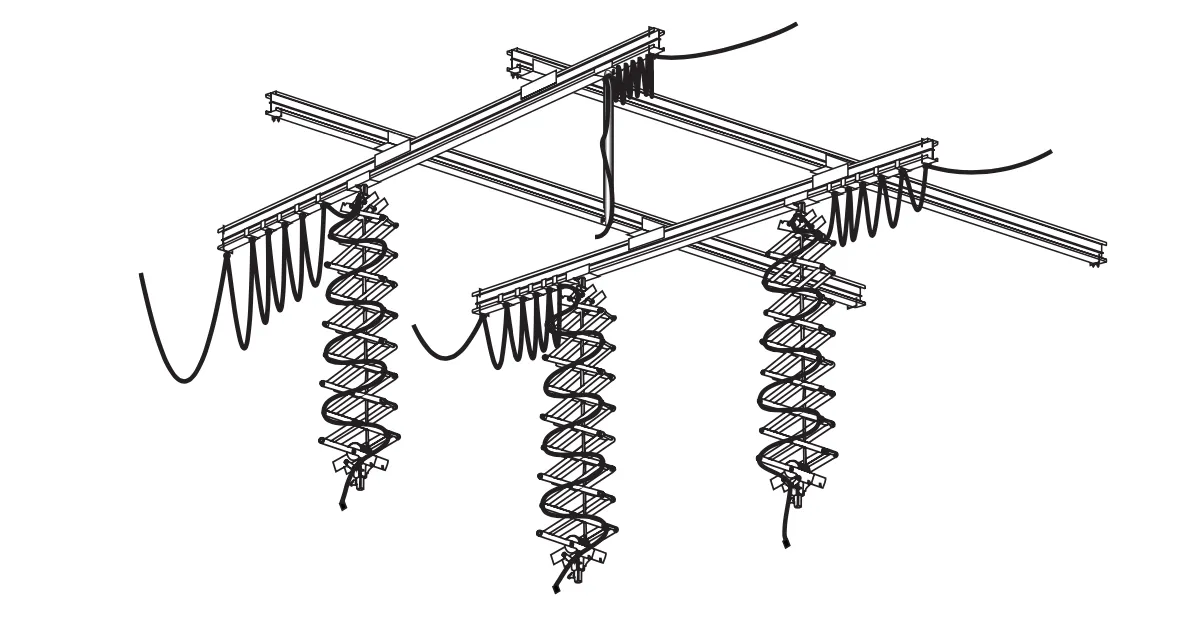
نظام مصابيح السقف FOMEI هو نظام احترافي الجودة من المسارات، والعربات، والبانتوجراف، ومكونات أخرى لتبسيط العمل في استوديو التصوير أو الأفلام. يتكون النظام من ثلاث مجموعات بأحجام مختلفة، تشمل الأجزاء التالية وإجراءات التركيب.
ملاحظة: كما يمكن إكمال نظام السقف بمكونات أخرى حسب الحاجة.
نظام السقف: الطقم 1 (3 × 3 أمتار)
نظام مصابيح السقف FOMEI مجموعة 1 هو 3 × 3 أمتار، ويتطلب المكونات وإجراءات التركيب التالية.
- 4 × مسار 3 متر
- منشأة سقف بمسارات 6 ×
- 4 × عربة مزدوجة
- 3 × بانتوغراف
- قضيب تلسكوبي واحد
- عربة واحدة بسعة 4 ×
- عربة 12 x مع تثبيت كابلات
- تثبيت 55 x بانتوغراف
- 8 × نهاية المسارات
- تقليل 4 x باستخدام برغي
- كابل أمان 4 x
- 4 × كابل 10 أمتار
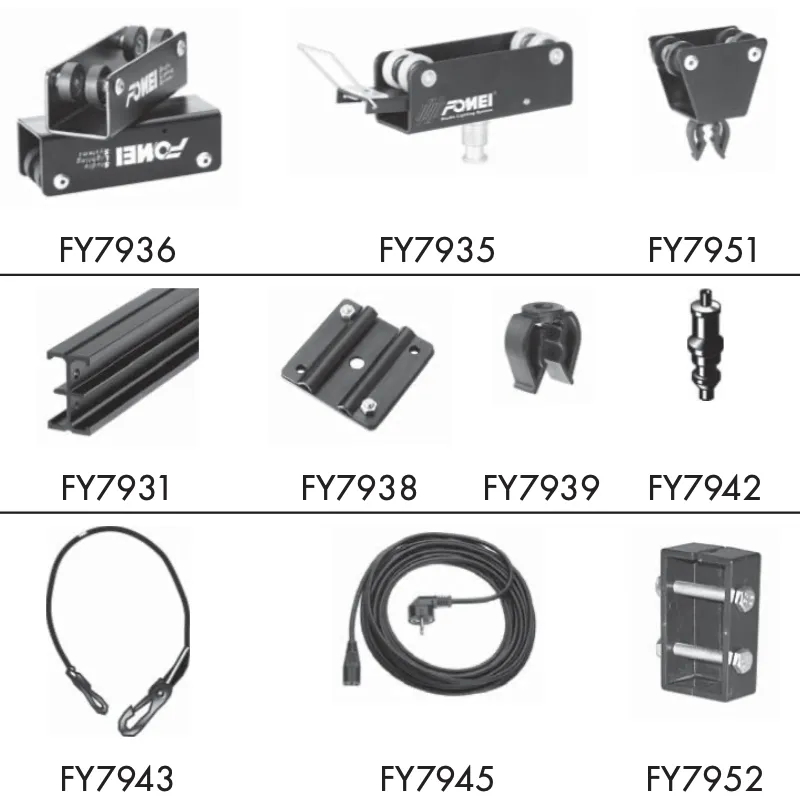
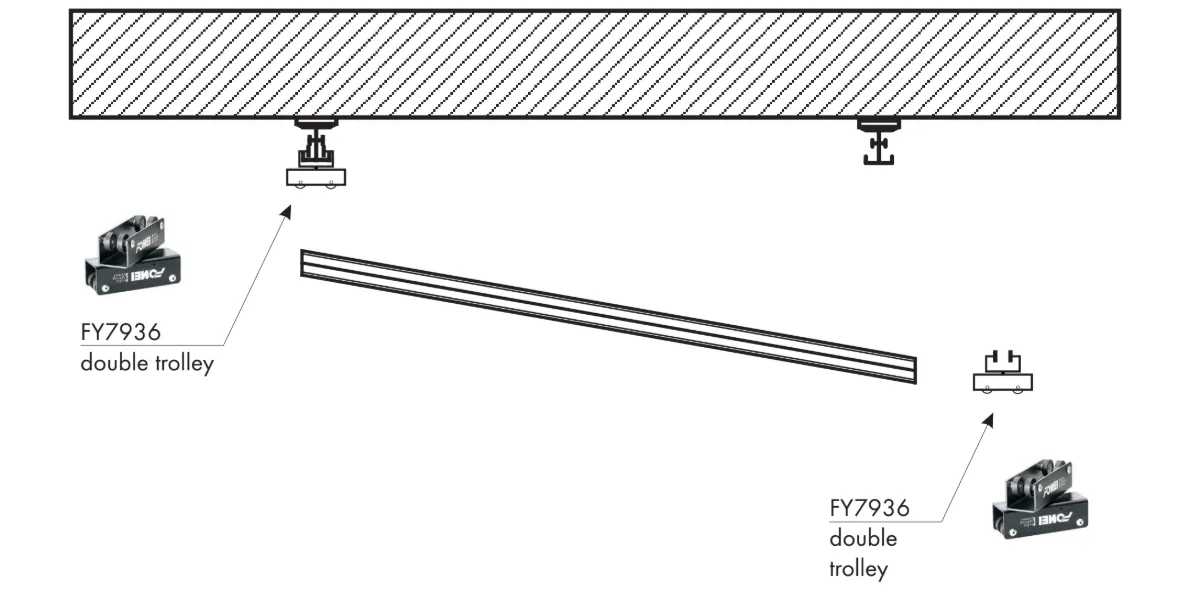
- السنة المالية 7936 - عربة مزدوجة
- FY7935 - ترام واحد
- FY7951 - إصلاح الكابل لمسار
- FY7931 - مسار 3 متر
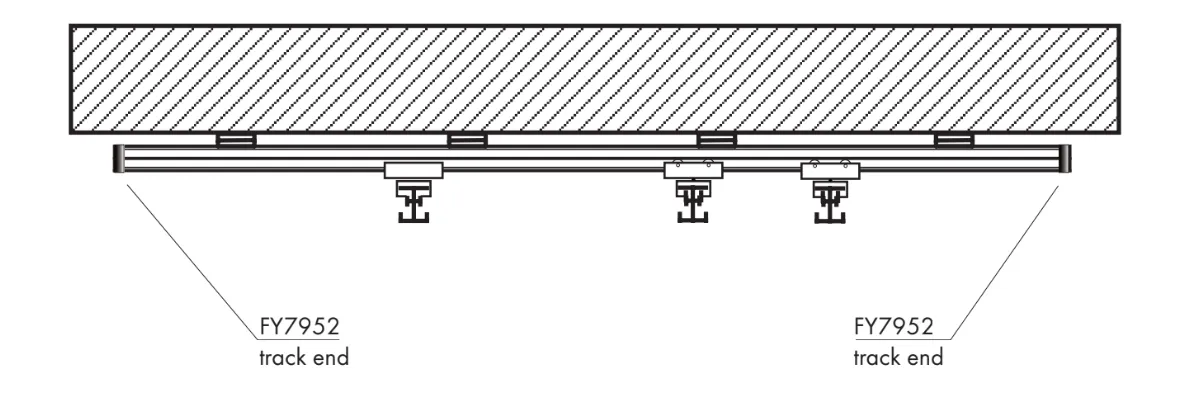
- FY7938 - تركيب المسار إلى السقف
- FY7939 - من موصل كابل إلى بانتوغراف
- السنة المالية 7942 - التخفيض
- السنة المالية 7943 - كابل الأمان
- FY7945 - سلك إدخال تيار متردد 10 أمتار
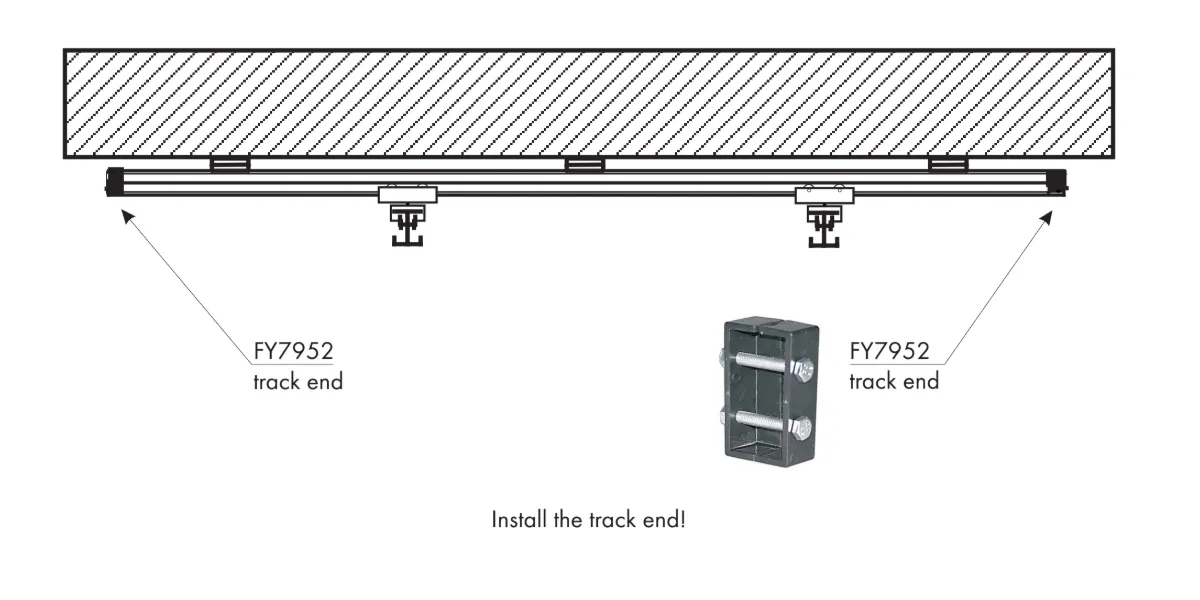
- FY7952 - نهاية المسار
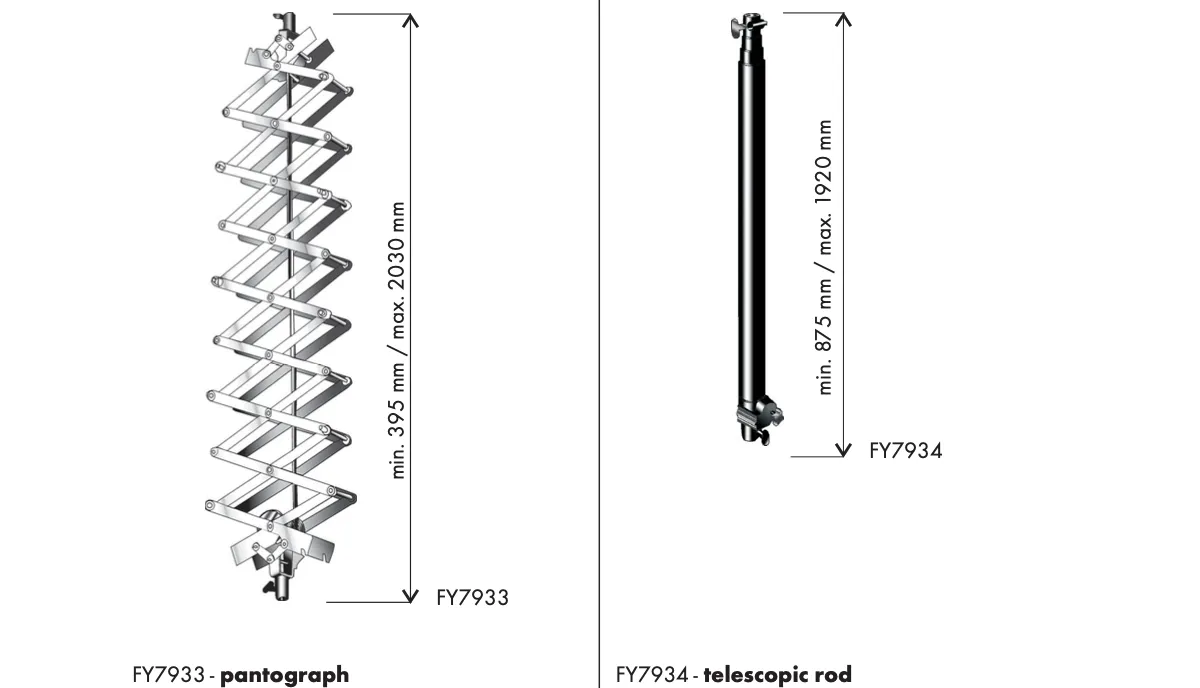
- FY7933 - بانتوغراف
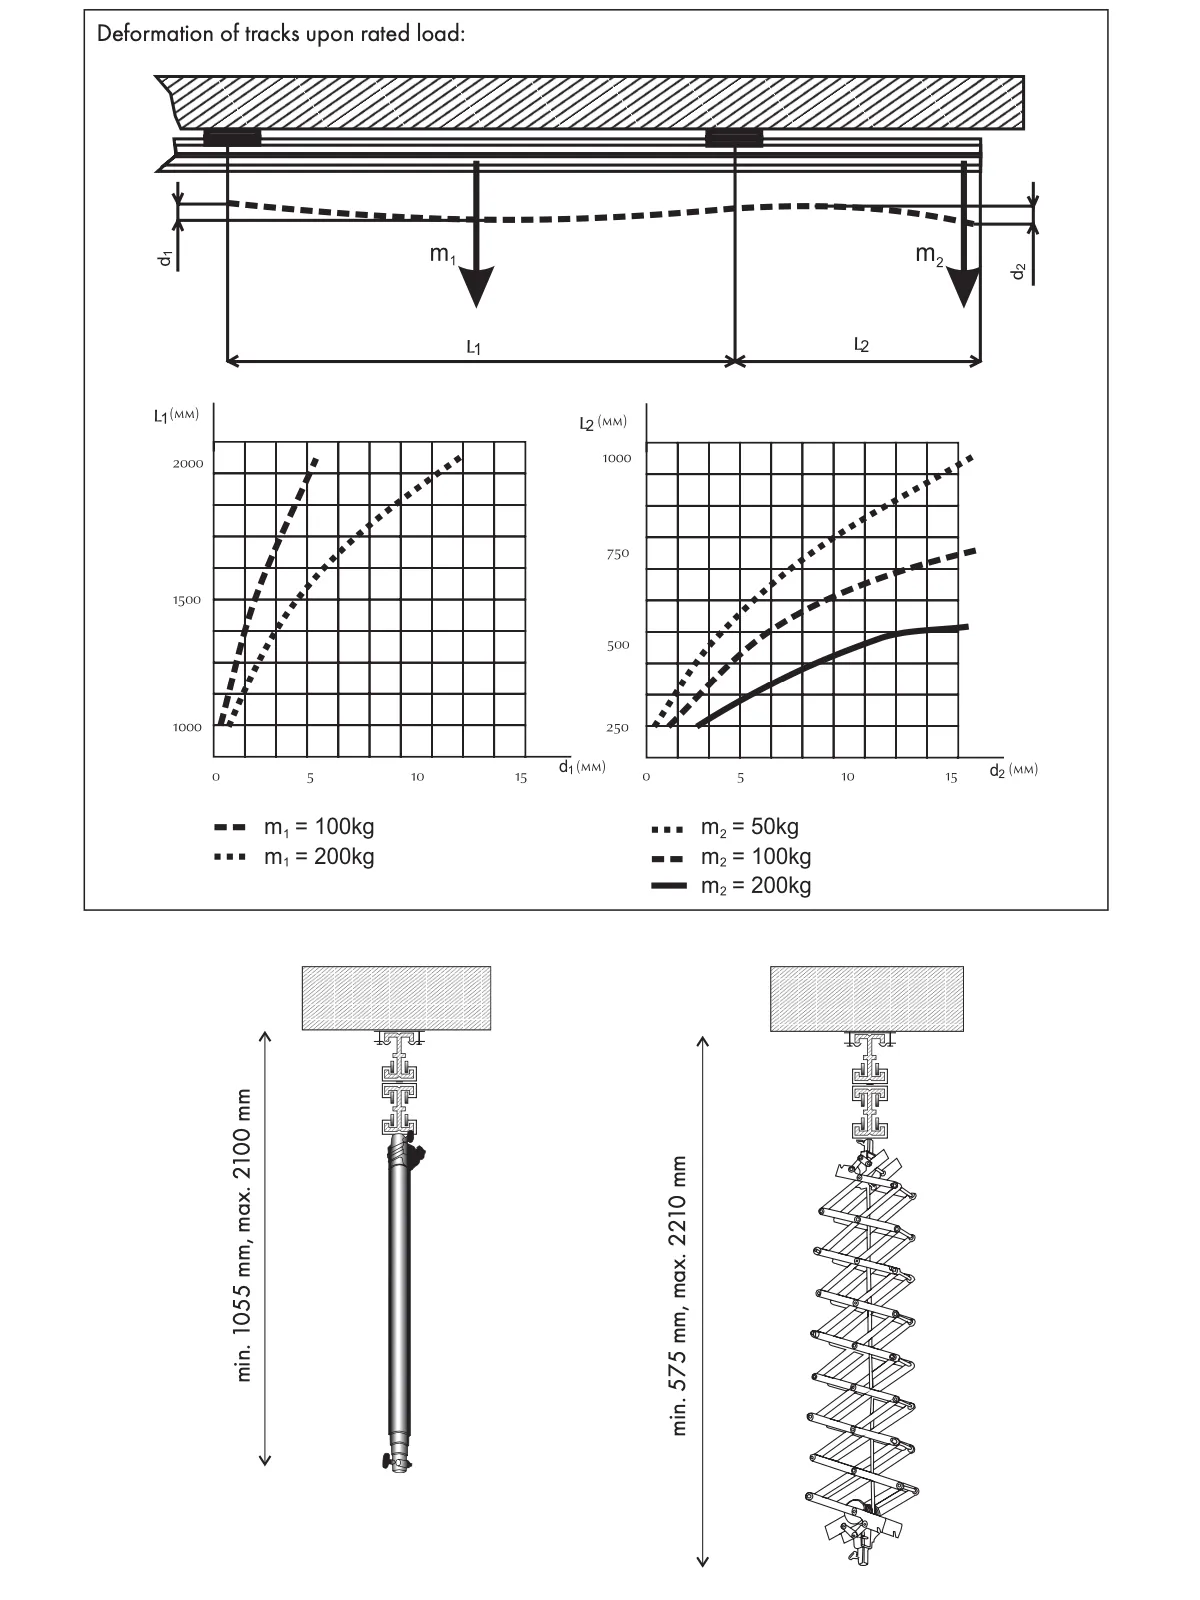
- عارضة عرضية من 395 مم إلى 2030 مم
- الحمل الأقصى 1-15 كجم
- خيار تنظيم انسداد الانزلاق
- صمام أمان
- FY7934 - قضيب تلسكوبي
- 3 أقسام
- عارضة من 875 مم إلى 1920 مم
- زنبرك لسهولة التعامل
- صمام أمان
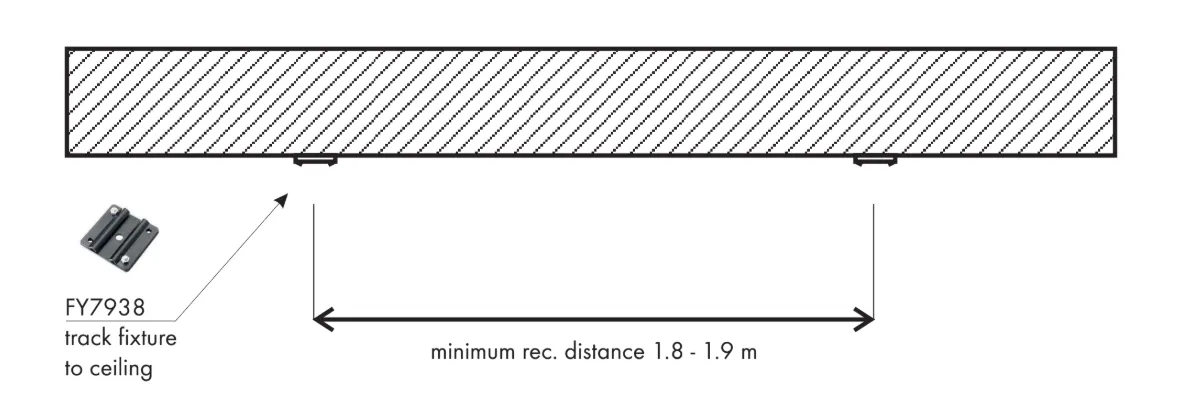
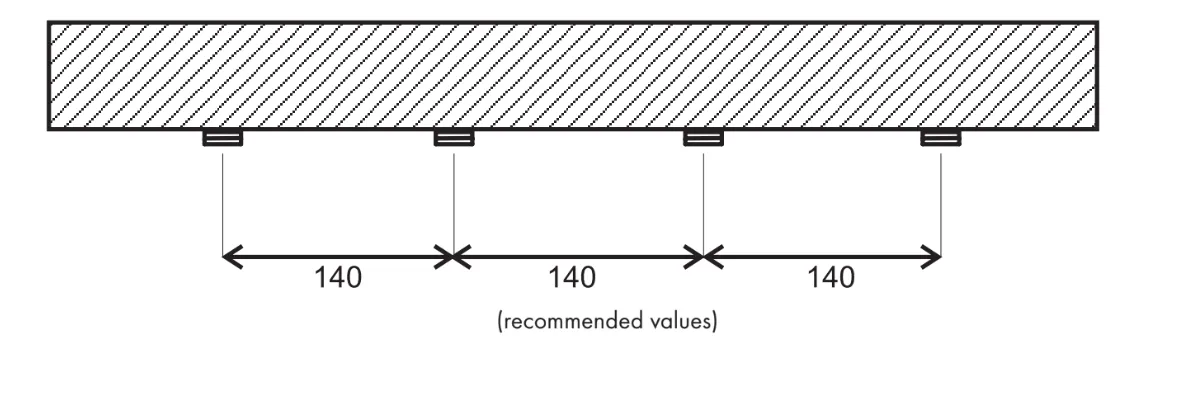
- يجب أن تكون مسارات المحامل الرئيسية على بعد 180 سم على الأقل عن بعضها البعض. هذا يضمن الأداء الصحيح للعجلات المتحركة.
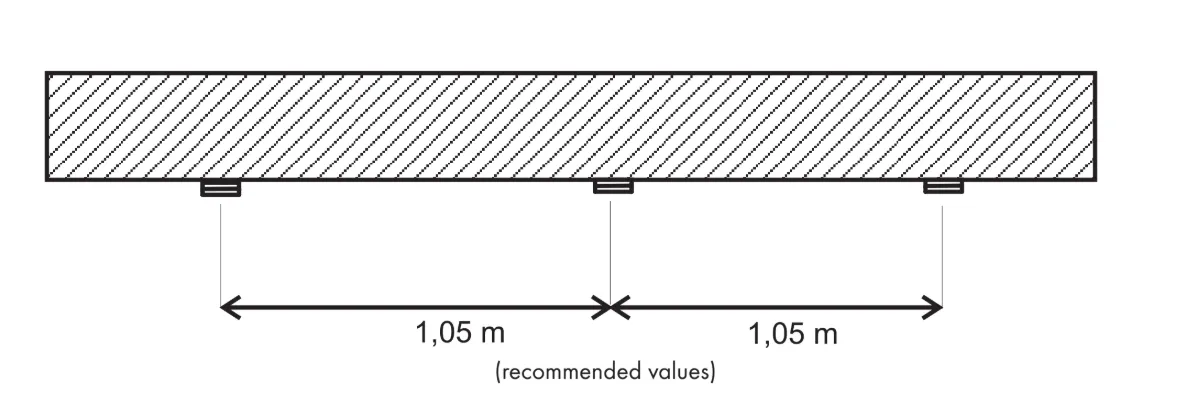
- لاحظ أنه، بالنظر إلى الحد الأدنى لمقاومة التدحرج، من الضروري أن تكون المسارات الرئيسية متوازنة.
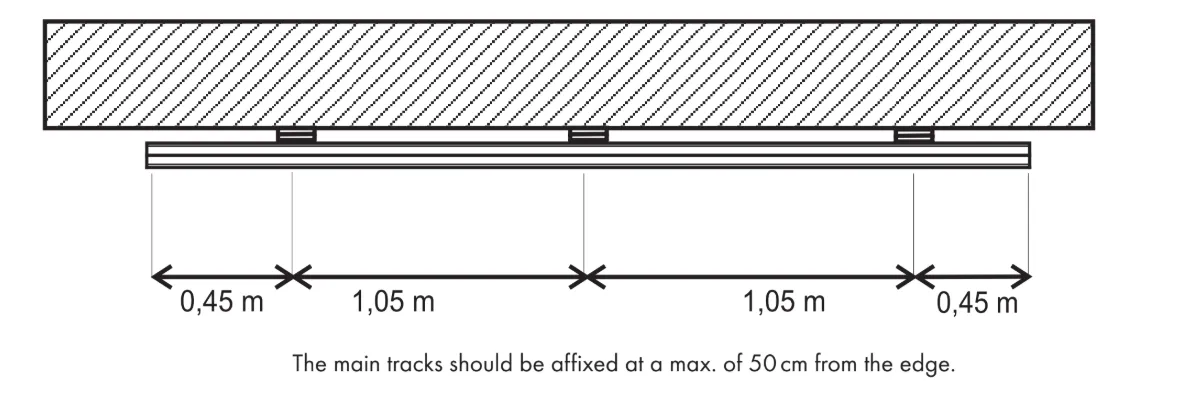
- تأكد من تثبيت المسارات الرئيسية على بعد أقصى 50 سم من الحافة.
الإجراء الأنسب والأكثر تأكيدا لتركيب المسارات هو كما يلي.
- تركيب العربات المزدوجة، التي تم دورانها بحوالي 80 درجة، على أحد المسارات المثبتة على السقف.
- ركب الترام المزدوج على المسار المتحرك.
- ادفع المسار المتحرك إلى العربة المزدوجة، التي تركب في المسار المثبت.
- قم بتركيب المسار المتحرك مع الترام في المسار المثبت.
- الآن، تم تركيب العربات المزدوجة على المسارات المثبتة، وتم تركيب المسار المتحرك في العربات المزدوجة.
- تابع المسار نفسه مع المسارات المتبقية.
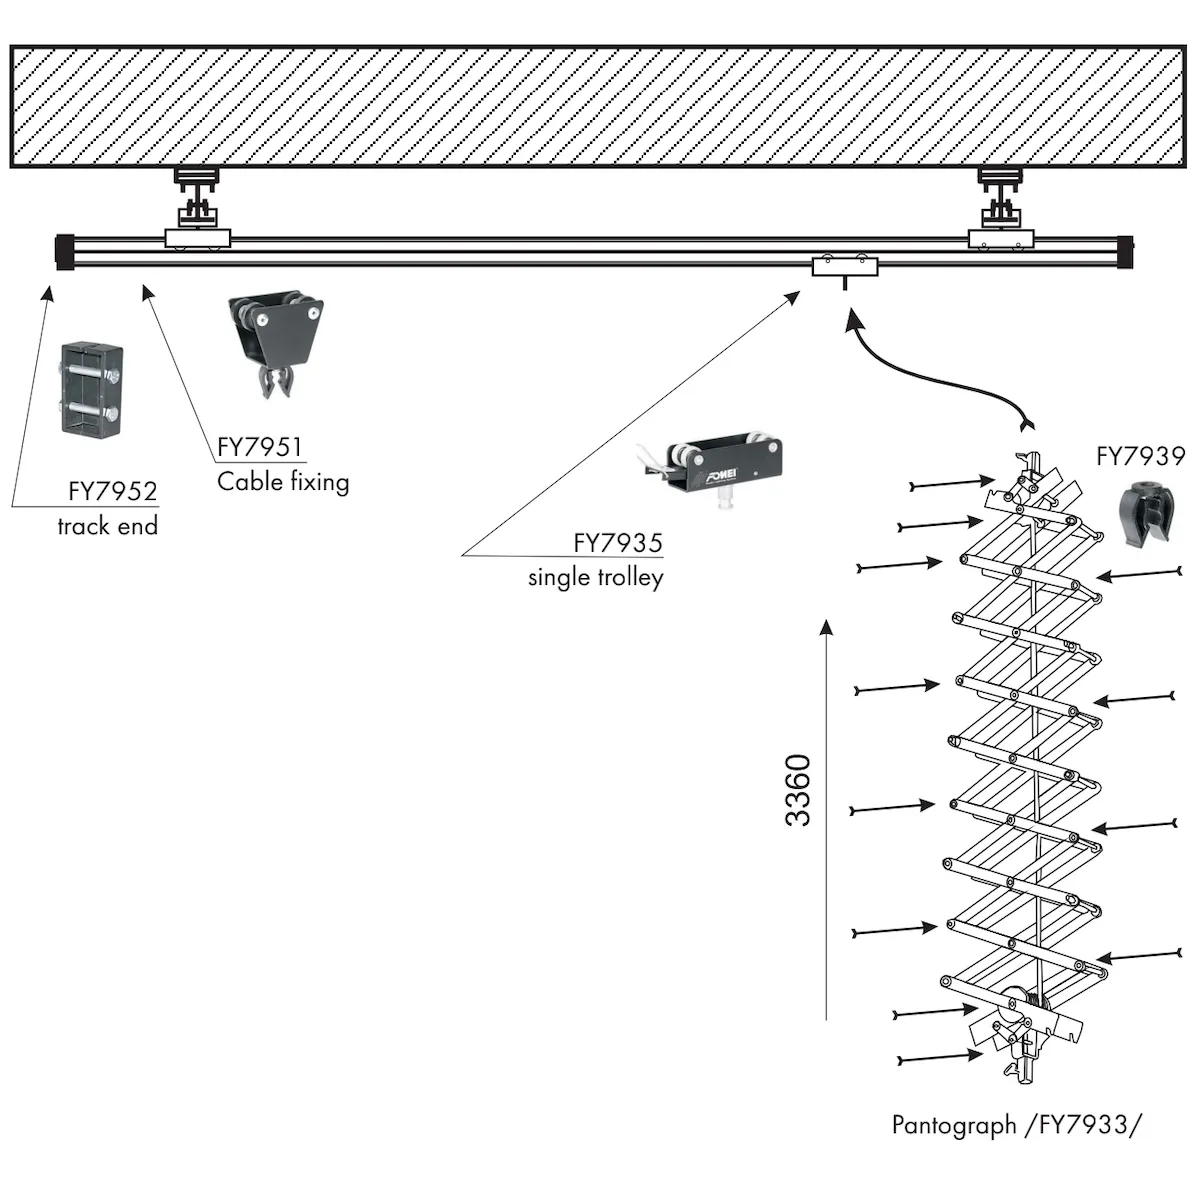
- ركب العربة المفردة /FY7935/ في المسار.
- قم بتركيب العربات التي تحتوي على تثبيتات كابلات في المسار /FY7951/.
- ضع نهايات المسار /FY7952/ على جانبي المسارات المتحركة.
- اللاحقة بانتوغراف /FY7933/ على الترام الواحد /FY7935/.
- قم بتركيب كابل تثبيت /FY7939/ على الحواف الموجودة على البانتوغراف.
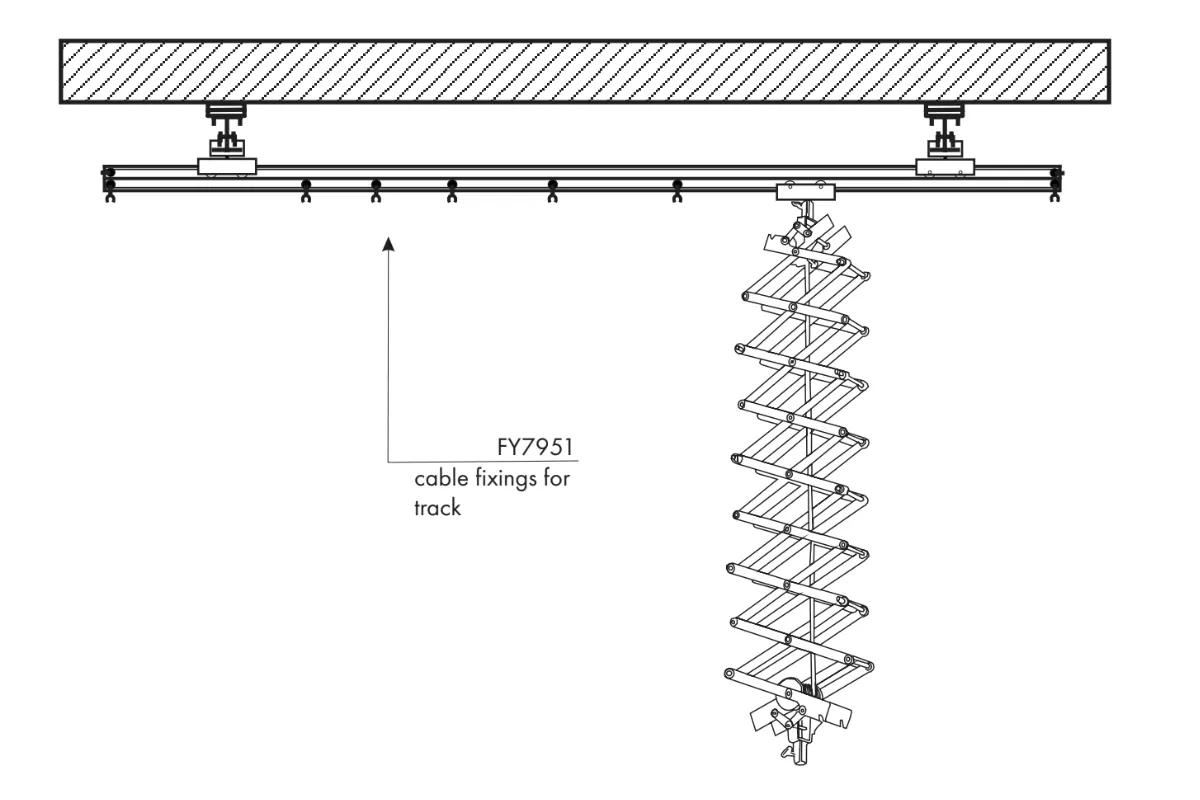
- وزع تثبيات الكابلات بشكل متساو على المسارات.
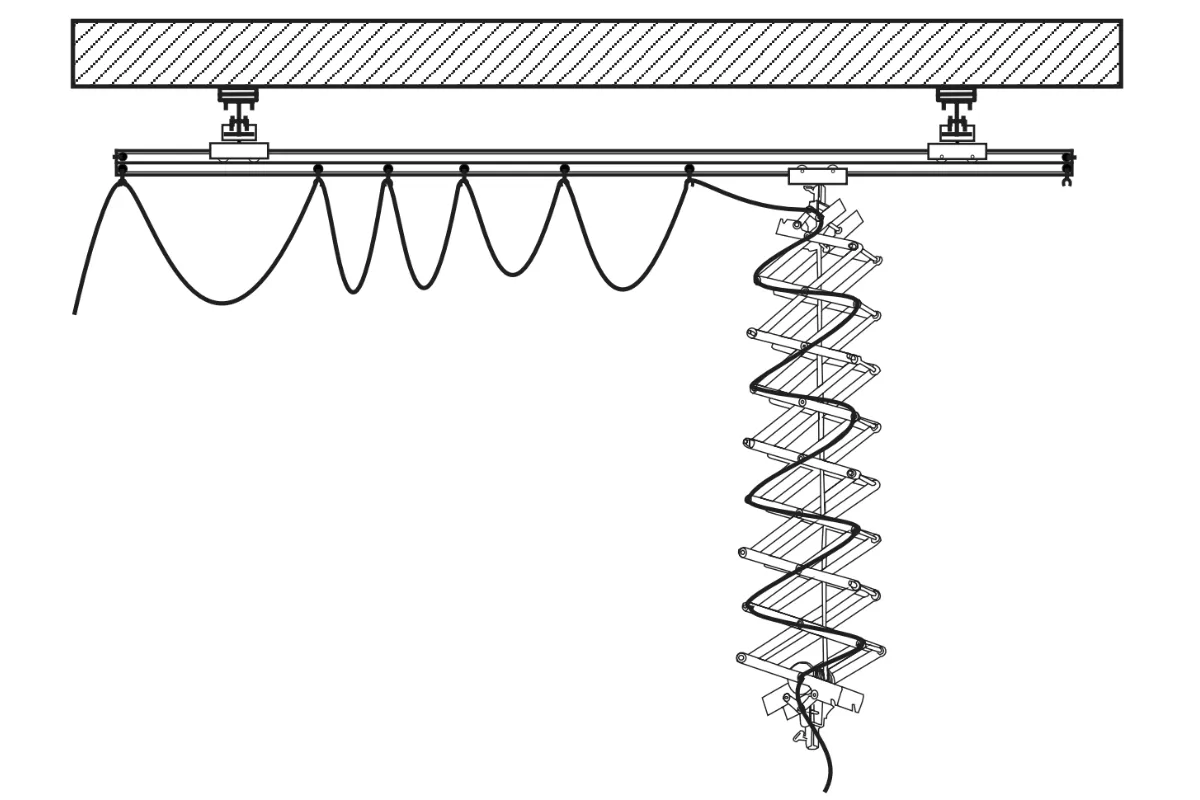
- قم بتركيب الكابل في المسارات والبانتوغرافات حتى يتمكن البانتوغراف من التحرك مع الكابل على طول المسار بأكمله.
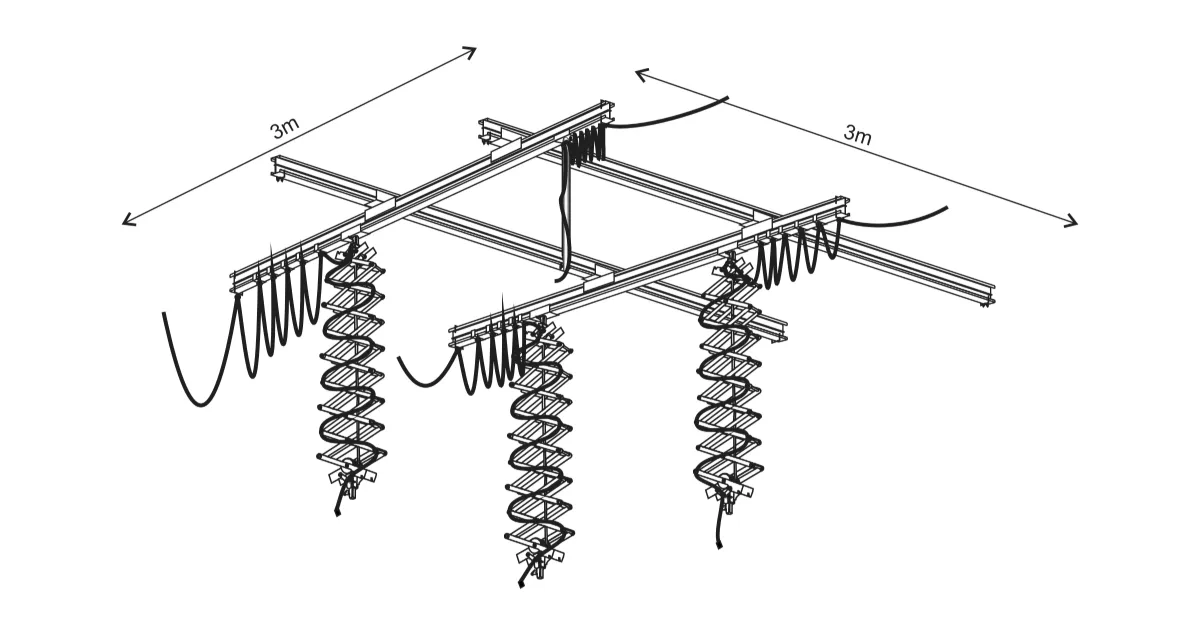
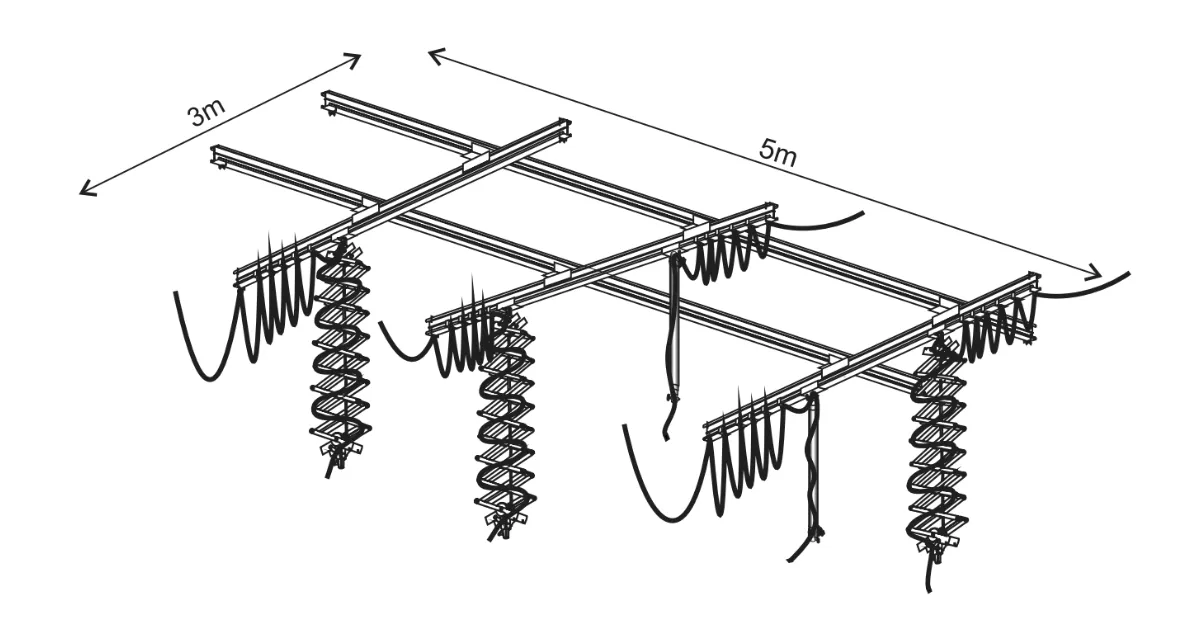
نظام السقف: الطقم 2 (3 × 5 أمتار)
نظام تركيبات إضاءة السقف FOMEI مجموعة 2 (3 × 5 أمتار) يتطلب المكونات وإجراءات التركيب التالية.
- 3x مسار 3M
- 2x مسار 5 متر
- تركيبة سقف 8x على المسار
- عربة مزدوجة 6x
- 3x بانتوغراف
- قضيب تلسكوبي 2x
- عربة 5x واحدة
- تثبيت بانتوغراف 70x
- نهاية مسار 10x - زوج واحد
- تقليل 5x باستخدام البرغي
- كابل أمان 5x
- كابل 5x بطول 10 أمتار
- ترام كابل 15x
- السنة المالية 7936 - عربة مزدوجة
- FY7935 - ترام واحد
- FY7951 - إصلاح الكابل لمسار
- FY7931 - مسار 3 متر
- FY7938 - تركيب المسار إلى السقف
- FY7939 - من موصل كابل إلى بانتوغراف
- السنة المالية 7942 - التخفيض
- السنة المالية 7943 - كابل الأمان
- FY7945 - سلك إدخال تيار متردد 10 أمتار
- FY7952 - نهاية المسار
- FY7933 - بانتوغراف
- عارضة عرضية من 395 مم إلى 2030 مم
- الحمل الأقصى 1-15 كجم
- خيار تنظيم انسداد الانزلاق
- صمام أمان
- FY7934 - قضيب تلسكوبي
- 3 أقسام
- عارضة من 875 مم إلى 1920 مم
- زنبرك لسهولة التعامل
- صمام أمان
- يجب أن تكون مسارات المحامل الرئيسية على بعد 180 سم على الأقل عن بعضها البعض. هذا يضمن الأداء الصحيح للعجلات المتحركة.
- لاحظ أنه، بالنظر إلى الحد الأدنى لمقاومة التدحرج، من الضروري أن تكون المسارات الرئيسية متوازنة.

- تأكد من تثبيت المسارات الرئيسية على بعد أقصى 50 سم من الحافة.
الطريقة الأنسب والأكثر تدقيقا لتركيب المسارات هي كما يلي.
- تركيب العربات المزدوجة، التي تم دورانها بحوالي 80 درجة، على أحد المسارات المثبتة على السقف.
- ركب العربة المزدوجة على المسار المتحرك.
- ادفع المسار المتحرك إلى العربة المزدوجة، التي تركب في المسار المثبت.
- قم بتركيب المسار المتحرك مع الترام في المسار المثبت.
- الآن، تم تركيب العربات المزدوجة على المسارات المثبتة، وتم تركيب المسار المتحرك في العربات المزدوجة.
- تابع المسار نفسه مع المسارات المتبقية.
- ركب العربة المفردة /FY7935/ في المسار.
- قم بتركيب العربات التي تحتوي على تثبيتات كابلات في المسار /FY7951/.
- ضع نهايات المسار /FY7952/ على جانبي المسارات المتحركة.
- اللاحقة بانتوغراف /FY7933/ على الترام الواحد /FY7935/.
- قم بتركيب كابل تثبيت /FY7939/ على الحواف الموجودة على البانتوغراف.
- وزع تثبيات الكابلات بشكل متساو على المسارات.
- قم بتركيب الكابل في المسارات والبانتوغرافات حتى يتمكن البانتوغراف من التحرك مع الكابل على طول المسار بأكمله.
نظام السقف: الطقم 3 (5 × 5 أمتار)
نظام مصابيح السقف FOMEI مجموعة 3 (5 × 5 أمتار) يتطلب المكونات وإجراءات التركيب التالية.
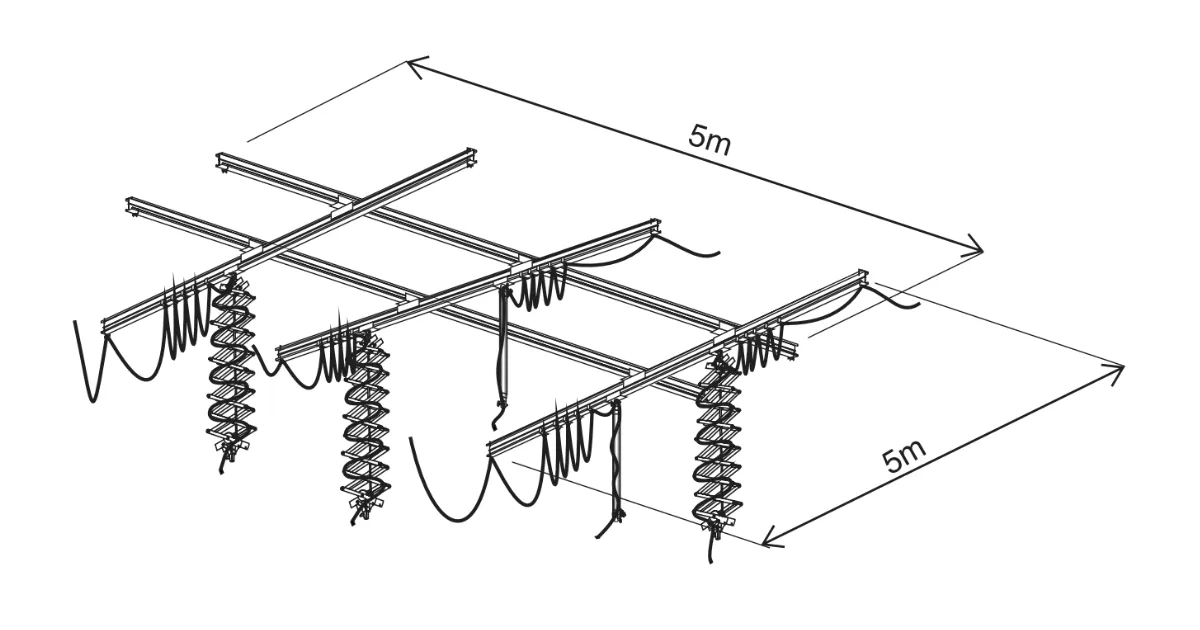
- 5x مسار 5M
- تركيبة سقف 8x على المسار
- عربة مزدوجة 6x
- 3x بانتوغراف
- قضيب تلسكوبي 2x
- عربة 5x واحدة
- تثبيت بانتوغراف 70x
- نهاية مسار 10x - زوج واحد
- تقليل 5x باستخدام البرغي
- كابل أمان 5x
- كابل 5x بطول 10 أمتار
- ترام كابل 15x
- السنة المالية 7936 - عربة مزدوجة
- FY7935 - ترام واحد
- FY7951 - إصلاح الكابل لمسار
- FY7931 - مسار 3 متر
- FY7938 - تركيب المسار إلى السقف
- FY7939 - من موصل كابل إلى بانتوغراف
- السنة المالية 7942 - التخفيض
- السنة المالية 7943 - كابل الأمان
- FY7945 - سلك إدخال تيار متردد 10 أمتار
- FY7952 - نهاية المسار
- FY7933 - بانتوغراف
- عارضة عرضية من 395 مم إلى 2030 مم
- الحمل الأقصى 1-15 كجم
- خيار تنظيم انسداد الانزلاق
- صمام أمان
- FY7934 - قضيب تلسكوبي
- 3 أقسام
- عارضة من 875 مم إلى 1920 مم
- زنبرك لسهولة التعامل
- صمام أمان
- يجب أن تكون مسارات المحامل الرئيسية على بعد 180 سم على الأقل عن بعضها البعض. هذا يضمن الأداء الصحيح للعجلات المتحركة.
- لاحظ أنه، بالنظر إلى الحد الأدنى لمقاومة التدحرج، من الضروري أن تكون المسارات الرئيسية متوازنة.
- تأكد من تثبيت المسارات الرئيسية على بعد أقصى 50 سم من الحافة.
الإجراء الأنسب والأكثر تأكيدا لتركيب المسارات هو كما يلي.
- تركيب العربات المزدوجة، التي تم دورانها بحوالي 80 درجة، على أحد المسارات المثبتة على السقف.
- ركب العربة المزدوجة على المسار المتحرك.
- ادفع المسار المتحرك إلى العربة المزدوجة، التي تركب في المسار المثبت.
- قم بتركيب المسار المتحرك مع الترام في المسار المثبت.
- الآن، تم تركيب العربات المزدوجة على المسارات المثبتة، وتم تركيب المسار المتحرك في العربات المزدوجة.
- تابع المسار نفسه مع المسارات المتبقية.
- ركب العربة المفردة /FY7935/ في المسار.
- قم بتركيب العربات التي تحتوي على تثبيتات كابلات في المسار /FY7951/.
- ضع نهايات المسار /FY7952/ على جانبي المسارات المتحركة.
- اللاحقة بانتوغراف /FY7933/ على الترام الواحد /FY7935/.
- قم بتركيب كابل تثبيت /FY7939/ على الحواف الموجودة على البانتوغراف.
- وزع تثبيات الكابلات بشكل متساو على المسارات.
- قم بتركيب الكابل في المسارات والبانتوغرافات حتى يتمكن البانتوغراف من التحرك مع الكابل على طول المسار بأكمله.
ملاحظات ختامية
للحصول على الوثائق الرسمية من الشركة المصنعة ومعلومات الضمان لجهازك الخاص ب FOMEI، قم بزيارة الموقع الرسمي ل FOMEI على fomei.com.


سلسلة EOS Rebel


سلسلة EOS DSLR


سلسلة EOS M عديمة المرآة


سلسلة PowerShot


لقطة مقربة / محمولة باليد

توفر سلسلة EOS Rebel من Canon كاميرات DSLR سهلة الاستخدام للمبتدئين بجودة صورة قوية وعناصر تحكم بديهية وميزات متعددة الاستخدامات. مثالية لعشاق التصوير الفوتوغرافي ، توفر هذه الكاميرات تركيزا بؤريا تلقائيا موثوقا به وشاشات لمس متغيرة الزوايا وتسجيل فيديو عالي الدقة أو 4K.
اتصال
القرار (MP)
دقة
توفر سلسلة EOS DSLR من Canon صورا عالية الجودة وتركيزا بؤريا تلقائيا سريعا وتعدد الاستخدامات، مما يجعلها مثالية لكل من التصوير الفوتوغرافي وإنتاج الفيديو.
اتصال
القرار (MP)
دقة
تجمع سلسلة EOS M Mirrorless Series من Canon بين التصميم صغير الحجم والأداء الشبيه بكاميرا DSLR. تتميز هذه الكاميرات بعدسات قابلة للتبديل وضبط تلقائي للصورة سريع ومستشعرات صور عالية الجودة ، وهي رائعة للمسافرين ومنشئي المحتوى الذين يبحثون عن قابلية النقل دون التضحية بجودة الصورة.
اتصال
القرار (MP)
دقة
توفر الفئة PowerShot Series من Canon كاميرات صغيرة الحجم وسهلة الاستخدام للرماة العاديين والمتحمسين. مع الطرز التي تتراوح من كاميرات التأشير والتصوير البسيطة إلى كاميرات التكبير المتقدمة ، فإنها توفر الراحة وجودة الصورة القوية وميزات مثل تثبيت الصورة والفيديو بدقة 4K.
اتصال
القرار (MP)
دقة
تم تصميم الكاميرات المقربة والمحمولة باليد من Canon للتصوير الفوتوغرافي والفيديو التفصيلي عن قرب. فهي صغيرة الحجم وسهلة الاستخدام ، وتوفر تركيزا دقيقا وتصويرا عالي الدقة وإمكانيات ماكرو متعددة الاستخدامات - مثالية لمدونات الفيديو وتصوير المنتجات واللقطات المقربة الإبداعية.
اتصال
القرار (MP)
دقة


