دليل المستخدم لجهاز تشغيل الأسطوانات والذراع الروبوتية V8 لجهاز PhotoRobot Robotic Turntable and Robotic Arm V8
الوثائق التالية تعمل كدليل مستخدم لتوسعة PhotoRobot Robotic Turntable مع Robotic Arm V8. هذا الدليل مخصص فقط لعملاء PhotoRobot الذين اشتروا جهازا مؤخرا. يهدف إلى تسهيل الفهم الأولي، والاختبار الأساسي، والتشغيل الأول لمحطة العمل الروبوتية. ابحث عن وصف مفصل لتوسعة Robotic Turntable مع Robotic Arm، بما في ذلك نظرة عامة على محطة العمل وتعليمات لاستخدام وإعداد PhotoRobot لأول مرة.
مهم: يجب دائما تنفيذ التركيب الأولي لجهاز PhotoRobot بواسطة سلطة معتمدة ل PhotoRobot. الجهات المختصة بتركيب PhotoRobot هي موزع معتمد، أو ممثل الشركة المصنعة نفسها.
ملاحظه: دائما راجع معلومات وتعليمات السلامة الخاصة ب PhotoRobot بالإضافة إلى الدليل المرفق مع جهازك قبل الاستخدام الأول.
جهاز تشغيل أسطوانات روبوتي مع ذراع روبوتي V8 توسعة
مبروك وشكرا لشراء جهاز PhotoRobot الخاص بك! يمثل PhotoRobot عقودا من الخبرة المباشرة والابتكار في التصوير الفوتوغرافي الآلي. تقدم تقنية مصممة خصيصا لتلبية الاحتياجات الفريدة، وفي الوقت نفسه توفر نظاما بيئيا متناميا من الحلول الجاهزة التي تدعم عملاء PhotoRobot. أنيق ومبتكر، يعد PhotoRobot بإنتاج أسهل وأسرع ومتسق في كل مرة تقوم فيها بتشغيل الاستوديو. مرحبا بكم في PhotoRobot.
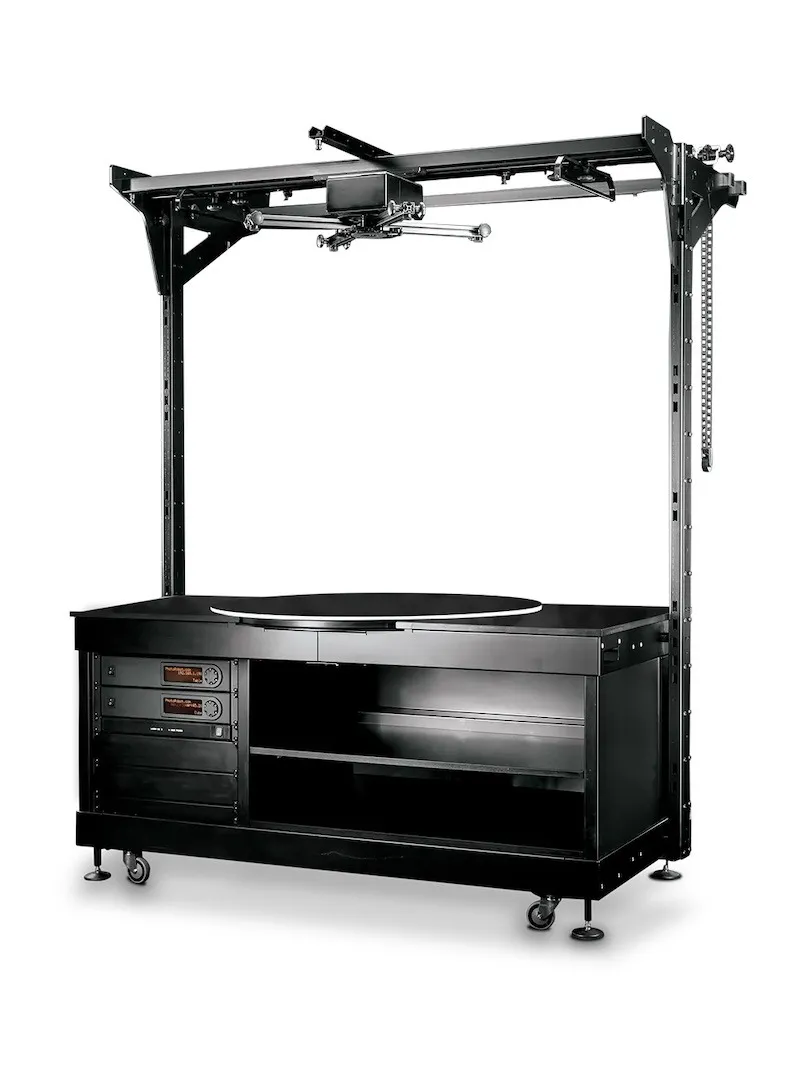
1. وصف محطة العمل - جهاز تشغيل دوارة روبوتي وذراع V8
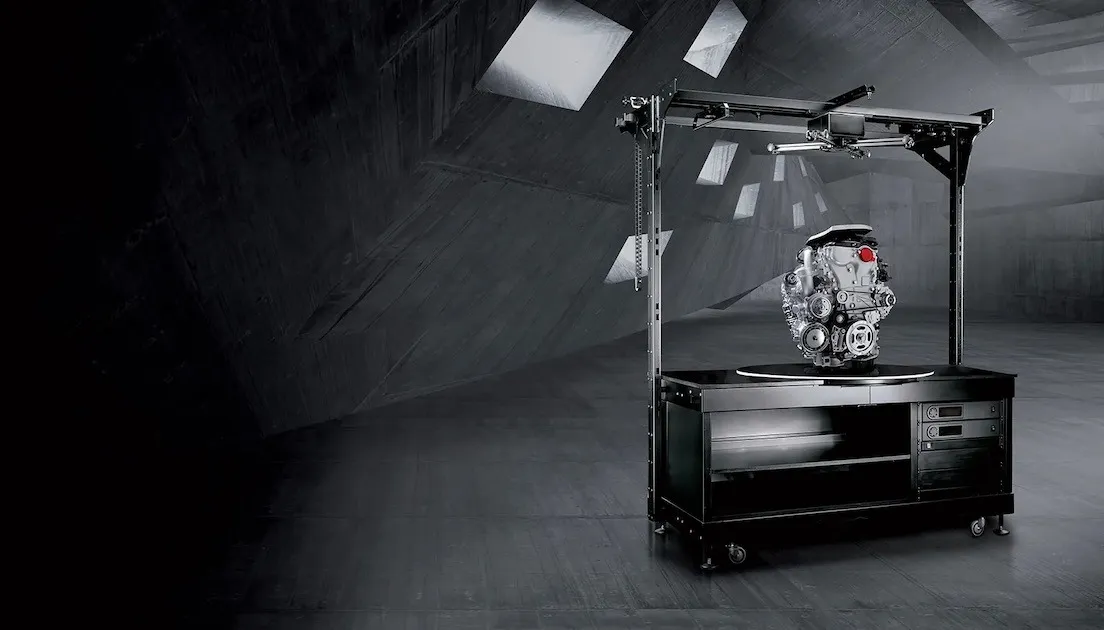
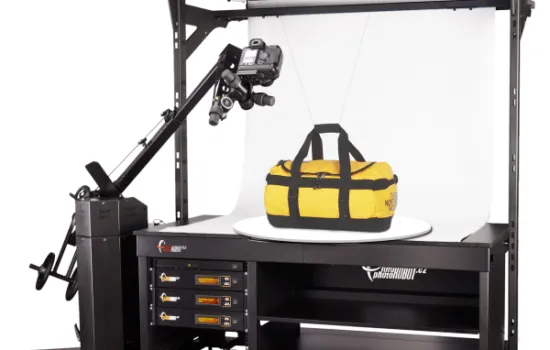
يعمل جهاز تشغيل الأسطوانات الروبوتية مع توسعة V8 من PhotoRobot كجهاز تشغيل دوارة عالمي لتصوير المنتجات بعرض 360 درجة للأجسام الثقيلة. يدعم جهاز التشغيل الأدوار أجساسا صغيرة لكنها ثقيلة يصل وزنها إلى 200 كيلوغرام، مثل الأدوات والمحركات وقطع غيار السيارات وآلات التفريز وغيرها من الأشياء الثقيلة. بالاقتران مع محرك الذراع الروبوتية V8، تعمل محطة العمل على تبسيط وتسريع التصوير ثلاثي الأبعاد بزاوية 360 درجة وتصوير ثلاثي الأبعاد متعدد الصفوف. يقوم ذراع الروبوت بمزامنة التقاط الصور وكذلك حركة الكاميرا المركبة مع دوران العنصر على جهاز الأسطوانة. يتيح ذلك التقاط سريع لعدة صفوف بزاوية 360 درجة حول العناصر، بما في ذلك مشاهد الأسفل والعلوي لالتقاط صور ثلاثية الأبعاد بشكل سلس.
تشمل الميزات الرئيسية لجهاز التشغيل الآلي والذراع الروبوتية معا:
- جهاز تشغيل دوارة ثقيل بمقاومة التآكل وقدرة تحمل عالية تبلغ 200 كيلوغرام.
- لوحة أسطوانة مع بروز فوق حافة الطاولة للصور بزاوية الصفر.
- تحديد موقع الجسم الموجه بالليزر لإيجاد مركز الدوران المطلق دائما.
- تركيبات مدمجة للإضاءة والكابلات عبر داخل إطار الطاولة الدوارة.
- التقاط الكاميرا عن بعد متزامنة مع تدوير جهاز الأسطوانات الآلي.
- حركة الكاميرا سلسة على مسار دقيق دون اهتزاز ذراع الكاميرا.
- محطة الإرساء لتسهيل النقل وإعداد الذراع الآلي.
1.1. دمج الاستوديو - جهاز تشغيل دوارة روبوتي وذراع V8
داخل الاستوديو، يدعم جهاز تشغيل الأسطوانات الروبوتية تصوير الأجسام الصغيرة والثقيلة، بينما يتميز محرك Robotic Arm V8 بنطاق تثبيت واسع. وهذا يسمح بمرونة اختيار رؤوس الحامل الثلاثي والكاميرات عند استخدام محطة العمل. وفي الوقت نفسه، يتميز الذراع الروبوتية ببنية قوية، وحركة دقيقة، وحجمين لذراع الكاميرا لالتقاط أشياء بأحجام مختلفة. من الممكن توجيه ذراع الكاميرا الروبوتية عن بعد وبالتزامن مع أضواء القرص الدوارة والاستوديو لأتمتة التقاط الصور بالكامل وإنتاج صور ثلاثية الأبعاد واقعية للغاية.

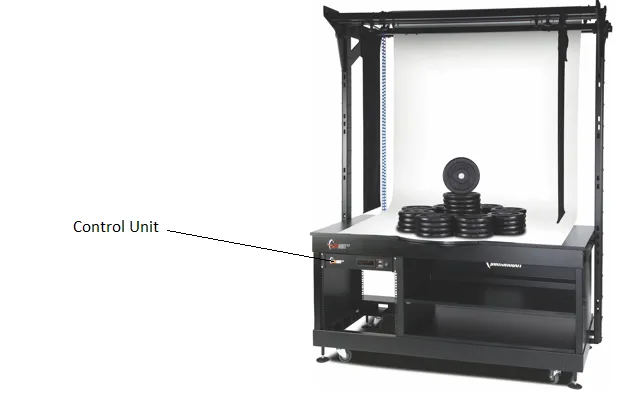
1.2. وحدة التحكم - مشغل دوارة روبوتي وذراع V8
أحد المكونات الرئيسية لجهاز التدوير الآلي مع توسعة V8 الذراع الروبوتية هو وحدة التحكم. وحدة التحكم جزء لا يتجزأ من النظام حيث تعمل وتتحكم في جميع حركة كل من الطاولة الدوارة الروبوتية ومحرك Arm V8.
وحدة التحكم ليست جزءا ماديا من الذراع الروبوتية. بدلا من ذلك، يتم تركيب وحدة التحكم فعليا داخل جهاز التشغيل الآلي إذا تم توصيل كلا الجهازين معا. يتم وضع وحدة التحكم في رف HD المخصص في الجزء العلوي الأيسر الأمامي من جسم آلة الطاولة الدوارة الروبوتية. في الوقت نفسه، يرتبط محرك الذراع الروبوتية V8 بجانب الذراع الروبوتية عند الاستخدام.
1.3. نظرة عامة على توسعة الذراع الروبوتية V8
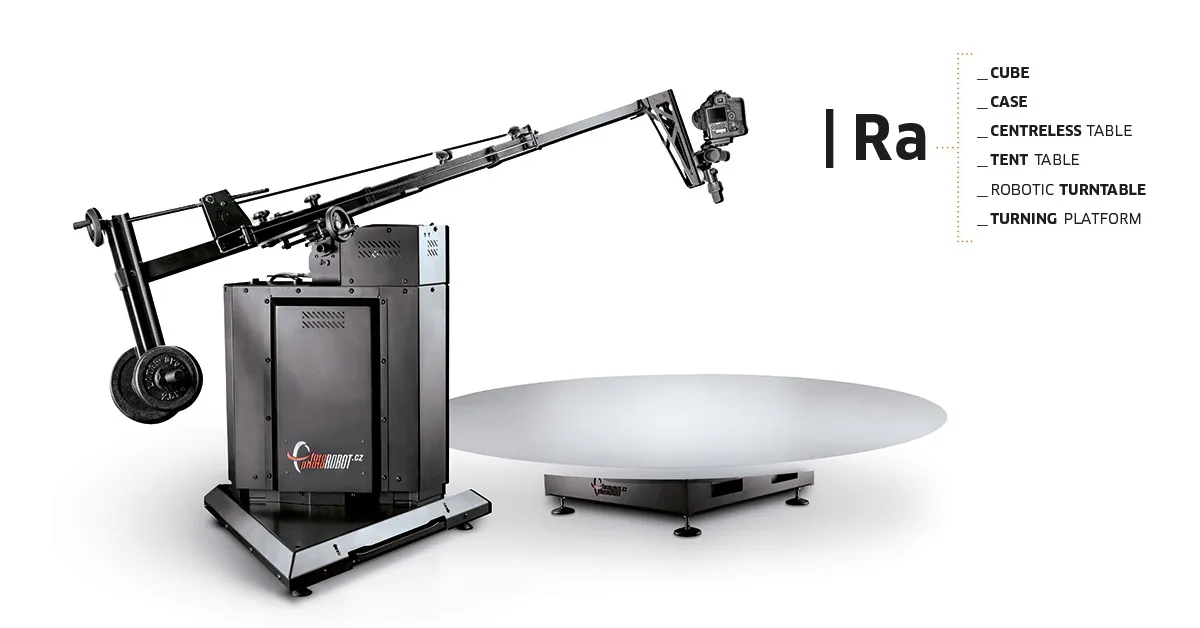
ذراع PhotoRobot Robotic Arm V8 متوافق مع غالبية أجهزة تشغيل PhotoRobot الدوارة والأجهزة المخصصة للتصوير الآلي بزاوية 360 درجة. يعمل بالتعاون مع روبوتات PhotoRobot مثل الطاولة بدون مركز، والمكعب، ومنصة التدوير، وأجهزة تشغيل الأسطوانات من الفئة C، وغيرها.
تشمل المكونات الرئيسية للذراع الروبوتية V8 ما يلي:
- وحدة التحكم (جهاز منفصل للتحكم في الذراع وجهاز تشغيل دوارة متوافق)
- ذراع تثبيت الكاميرا (واحد قصير، واحد طويل، أو كلاهما)
- عجلات قابلة للسحب على قاعدة الآلة لتسهيل الحركة.
- محطة التوصيل لإعداد سريع مع أجهزة تشغيل الأسطوانات والأجهزة المتوافقة.
بالإضافة إلى ذلك، لا يتأرجح ذراع الكاميرا، بحيث تتحرك الكاميرا دائما على مسار دقيق. هناك أيضا نطاق تركيب كبير يوفر مرونة في اختيار رؤوس الحامل والكاميرات، وميزات للنقل والإعداد بسهولة.
ملاحظه: راجع دليل المستخدم Robotic Arm V8 للحصول على تعليمات تقنية حول التجميع والتشغيل والاستخدام الأول للجهاز.
2. قبل الاستخدام الأول ل PhotoRobot
إذا كنت تستخدم PhotoRobot لأول مرة، فمن الضروري أولا فهم حل PhotoRobot من منظور تقني. PhotoRobot هو وحدة معيارية تتكون من مكونات الأجهزة والبرمجيات. يتطلب ذلك وجود كمبيوتر لتشغيل PhotoRobot وكذلك PhotoRobot نفسه، ليتم توصيله عبر نفس الشبكة التي يعمل بها الحاسوب الذي يشغله. بعد ذلك، يجب أن يكون لدى الشبكة اتصال بالإنترنت للوصول إلى خدمات PhotoRobot التي تعمل عبر السحابة.
ملاحظه: راجع PhotoRobot First Use & Basic Test قبل الاستخدام الأول لمحطة العمل الروبوتية لضمان الامتثال لمتطلبات التشغيل التقنية للاتصال بالشبكة.
بشكل عام، توجد متطلبات التشغيل الأساسية التالية.
- يجب أن تتصل وحدة التحكم بالشبكة المحلية.
- يعد الكمبيوتر ضروريا لتشغيل واجهة المستخدم الرسومية للخدمة أو برنامج المشغل المسمى _Controls.
- يجب أن يتصل الكمبيوتر عبر نفس الشبكة مثل وحدة التحكم.
- يجب أن يكون هناك اتصال إنترنت وظيفي على الشبكة.

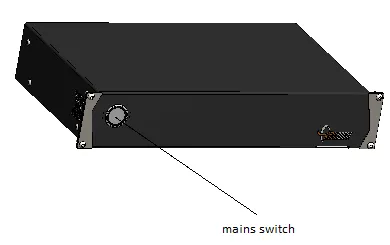
بعد توصيل PhotoRobot بالشبكة، تحقق من معلمات نظام توزيع الكهرباء (مثل الجهد والتردد). للقيام بذلك، استخدم موصل RJ45 في الجزء الخلفي من وحدة التحكم.
مهم: إذا لم يكن إعداد وحدة التحكم متوافقا، قم بإعداده أولا. للقيام بذلك، حدد محدد الجهد اليدوي في الجزء الخلفي من وحدة التحكم، وقم بتوصيل وحدة التحكم بالشبكة عبر كابل إيثرنت باستخدام موصل RJ45.

بعد ذلك، تأكد من تلبية متطلبات تكوين الشبكة التالية لتشغيل جهاز التشغيل الآلي مع ذراع V8.
- خادم DHCP في الشبكة إلزامي.
- يجب السماح باتصال منافذ TCP 7777 ، 7778.
- يجب السماح ببث UDP على المنفذ 6666.
- الاتصال بالإنترنت إلزامي.
- *. يجب السماح بالوصول photorobot.com.
- يجب السماح بالوصول as-unirobot.azurewebsites.net.
- يوصى بالاتصال السلكي ل PhotoRobot بشبكة LAN.
- تأكد من الإعداد بالرجوع إلى متطلبات شبكة PhotoRobot حسب الحاجة.
- قم بتوصيل قابس الطاقة بمقبس الطاقة.
وأخيرا، اضغط على مفتاح التيار الرئيسي في وحدة التحكم. عندما يتغير الحالة، سيتغير الضوء من ضوء يومض إلى ضوء ثابت، مما يشير إلى أن وحدة التحكم جاهزة للعمل.
2.1. ابحث عن عنوان IP الخاص ب PhotoRobot على الشبكة المحلية
بعد التكوين الصحيح للشبكة، من الضروري البحث عن عنوان IP الخاص ب PhotoRobot على الشبكة المحلية وتحديد هويته. للقيام بذلك، تم دمج تطبيق PhotoRobot Locator مباشرة داخل CAPP لتسهيل البحث والتعرف على وحدات التحكم على الشبكة. تأكد من أنك تستخدم أحدث إصدار من CAPP للوصول إلى هذه الميزة.
ثم، لتحديد روبوت على الشبكة مباشرة داخل CAPP، افتح النسخة المحلية من CAPP، اذهب إلى الإعدادات، واضغط على روبوتات / وحدات تحكم.
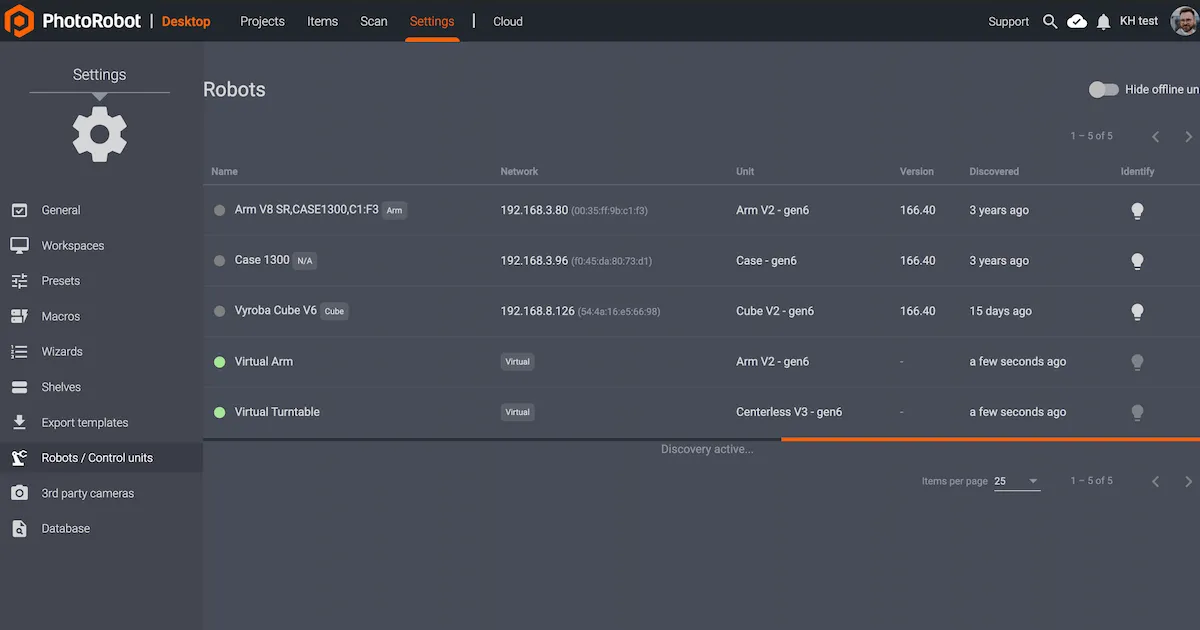
تعرض قائمة الروبوتات / وحدات التحكم أعمدة تحتوي على الاسم، الشبكة، الوحدة، النسخة، المكتشف، والتعريف لكل روبوت. إذا كانت النقطة على يسار اسم الروبوت خضراء، فهي متصلة. النقر على حقل الروبوت سيفتح واجهة موقع الروبوت الإلكتروني. سيجعل هذا أيضا ضوء LED على وحدة التحكم في الروبوت يومض باللون الأخضر لتسهيل التعرف عليه.
إذا كان العميل يتطلب تحميل التطبيق من الخارج، فإن PhotoRobot Locator متاح أيضا للتحميل عبر iOS ضمن تنزيلات حساب PhotoRobot.
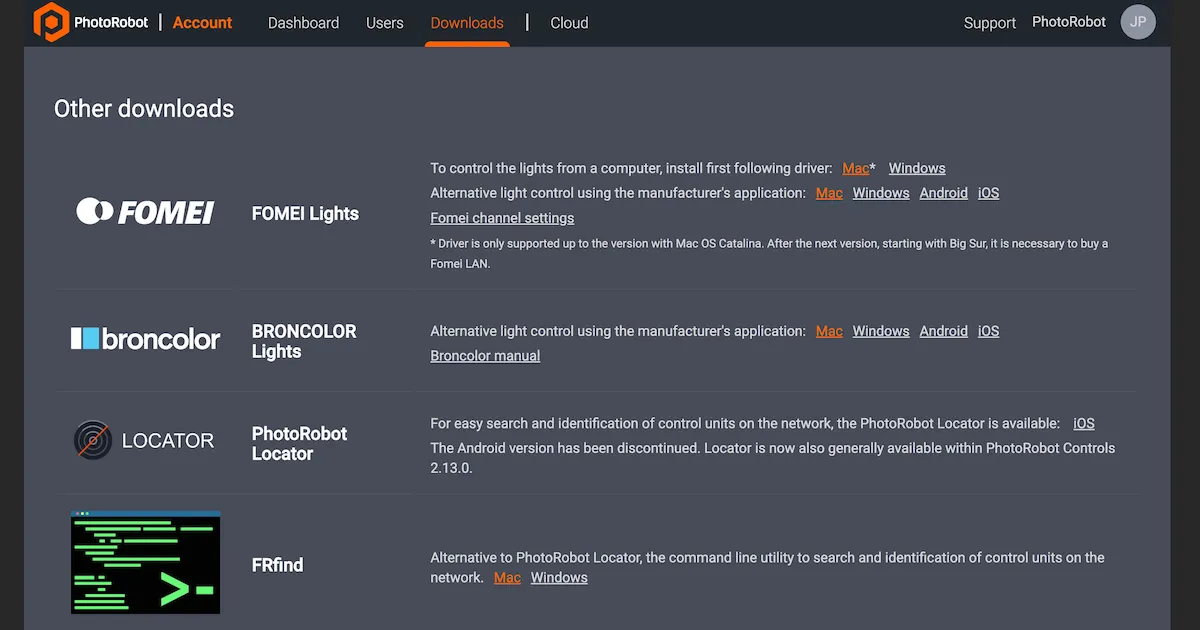
ملاحظة: تم إيقاف إصدار أندرويد من PhotoRobot Locator.
بدلا من ذلك، هناك أداة سطر الأوامر FRFind لنظام MacOS أو Windows للبحث في الشبكة وتحديد وحدات التحكم في PhotoRobot. اعثر على روابط لتحميل FRfind أيضا من خلال صفحة تنزيلات حساب PhotoRobot.
ثم، بعد العثور على جهاز PhotoRobot، انسخ عنوان IP والصق العنوان في أي متصفح ويب بصيغة URL. إذا نجحت، سيتم إطلاق واجهة Service GUI التي تعرض واجهة مستخدم أساسية لاختبار PhotoRobot.
2.2. الاختبار الأساسي لجهاز التشغيل الآلي ومحرك V8 الذراعي
مع فتح واجهة المستخدم الرسومية، استخدم أدوات التحكم البسيطة في واجهة المستخدم لتشغيل محركات الأجهزة أولا. بعد ذلك، استخدم الأسهم اليسرى أو اليمنى بجانب زر الإيقاف لتدوير المنصة إلى أي زاوية، ثم اختبر حركة الذراع الروبوتية. إذا تحركت الأجهزة إلى الزاوية المطلوبة، تكون محطة العمل جاهزة للعمل المنتظم.
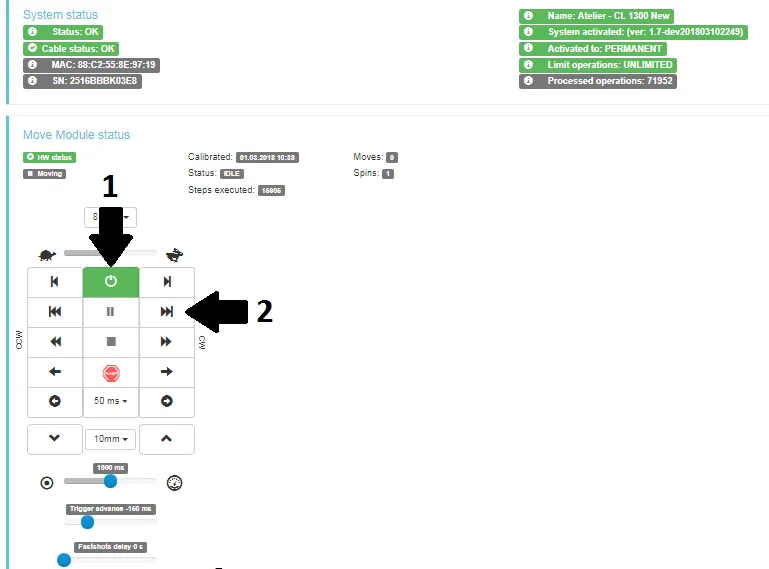
- شغل المحركات (السهم 1)، حاول الدوران (السهم 2).
- إذا اتبع الروبوت تعليمات الحركة، يكون جهاز PhotoRobot جاهزا للعمل المنتظم.
3. نظرة عامة على PhotoRobot _Controls البرمجيات
يتم التحكم عن بعد على جهاز تشغيل الأسطوانات الروبوتية مع محطة توسعة V8 من نوع Robotic Arm، بما في ذلك جميع الروبوتات والكاميرات والأضواء، عبر PhotoRobot _Controls البرمجيات. يدير البرنامج سير العمل ويوفر جميع الوظائف اللازمة لأتمتة فعالة في مرحلة ما بعد المعالجة.
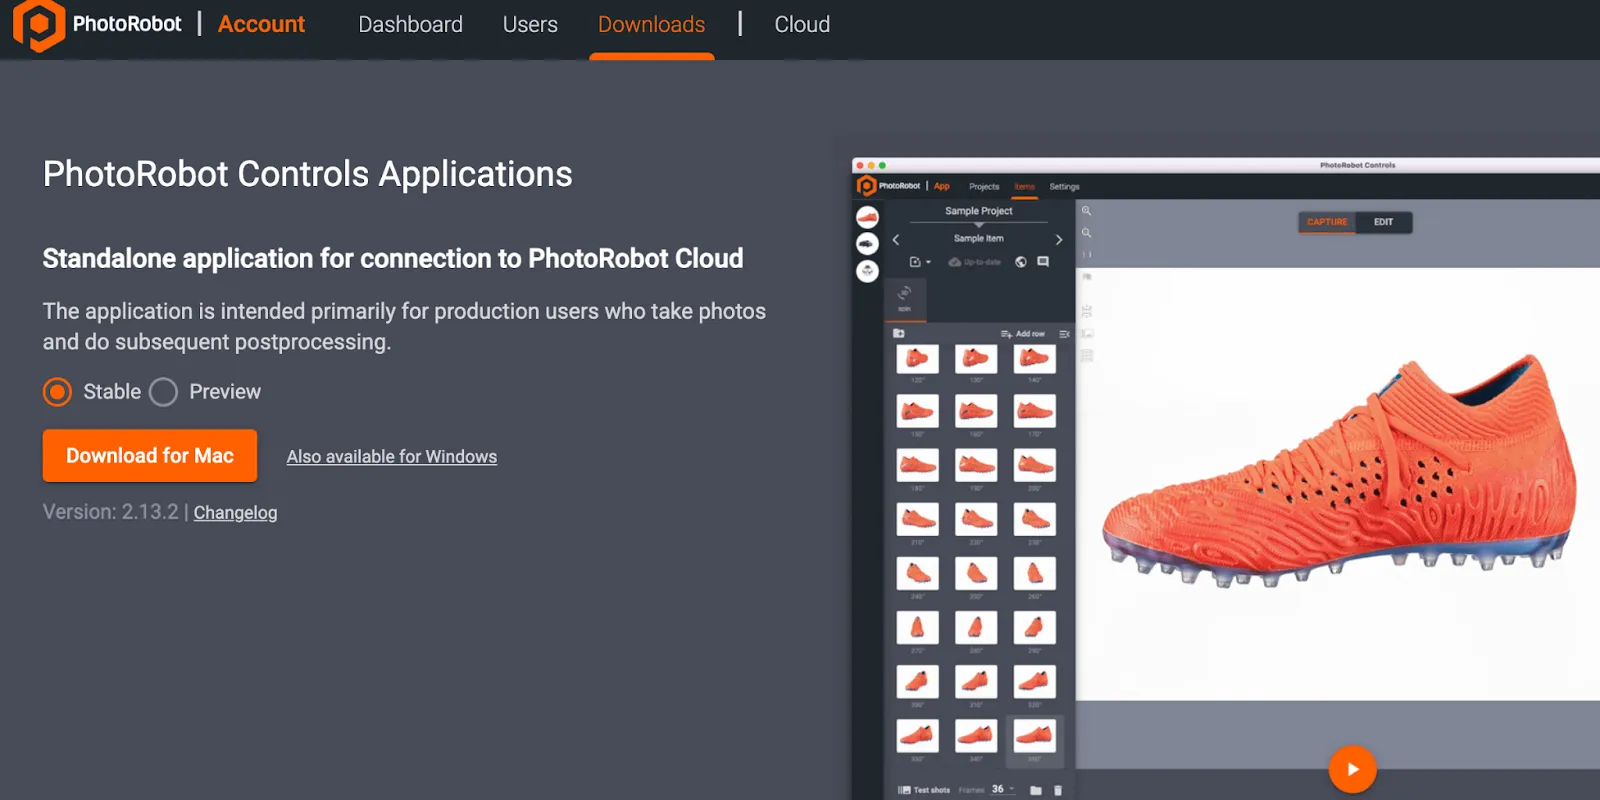
مهم: PhotoRobot _Controls غير مشمول مع تسليم الآلة؛ يتم شراؤه بشكل منفصل ومتاح عبر حسابك PhotoRobot.
للحصول على تعليمات ودعم تفصيلي حول تثبيت واستخدام برنامج تطبيقات PhotoRobot Controls، يرجى الرجوع إلى دليل المستخدم الخاص ب PhotoRobot Getting Starting.
4. ملصقات المعلومات
4.1. نظرة عامة على الرموز
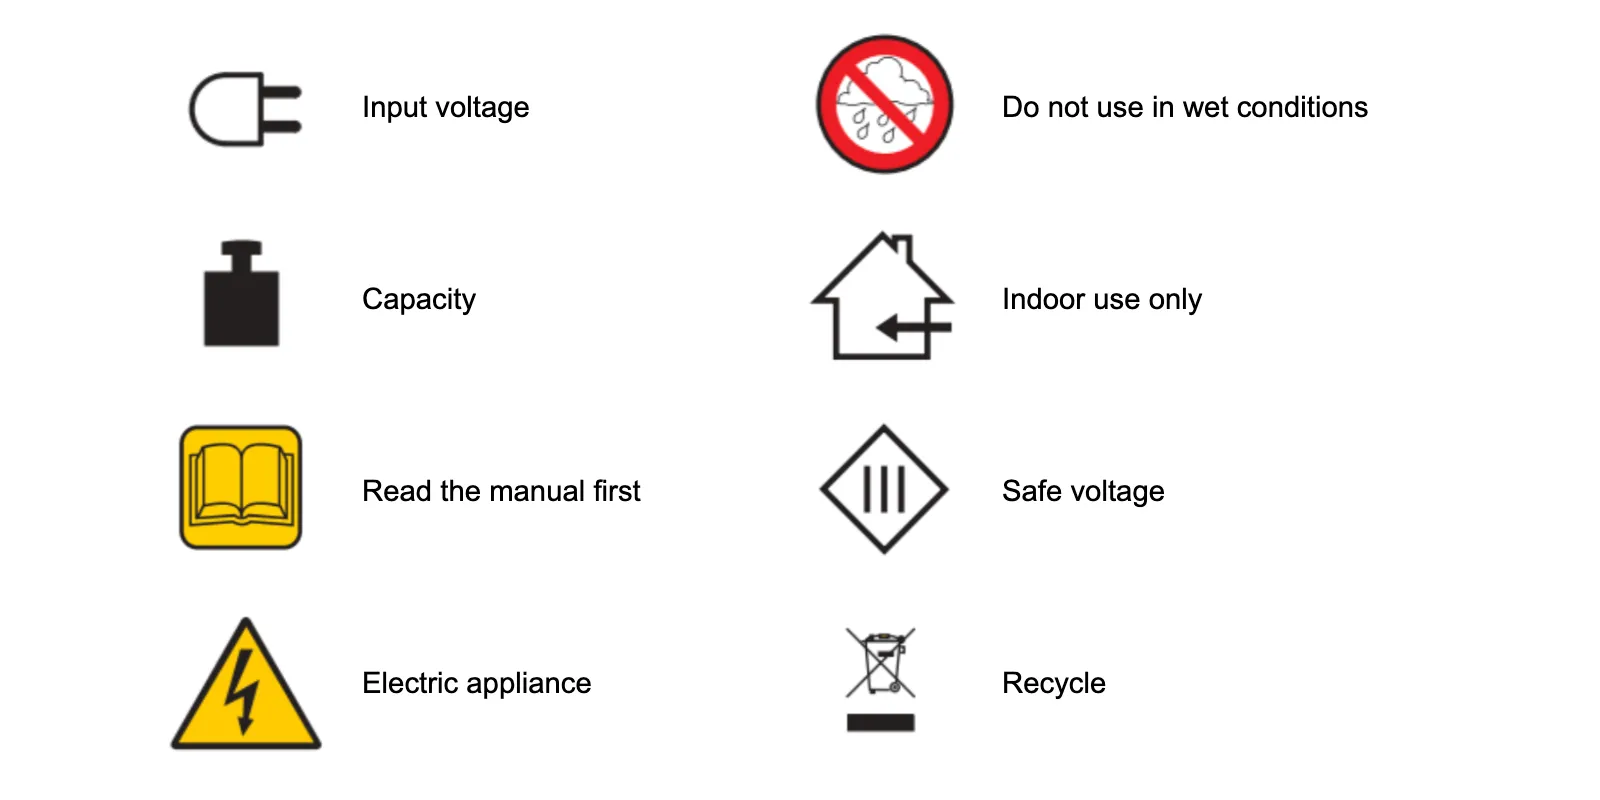
4.2. ملصقات الآلة والمكونات
للحصول على ملصقات معلومات للآلات والمكونات المحددة، يرجى الرجوع إلى قسم ملصقات المعلومات (3.1.) من PhotoRobot Safety Information and Instructions.


سلسلة EOS Rebel


سلسلة EOS DSLR


سلسلة EOS M عديمة المرآة


سلسلة PowerShot


لقطة مقربة / محمولة باليد

توفر سلسلة EOS Rebel من Canon كاميرات DSLR سهلة الاستخدام للمبتدئين بجودة صورة قوية وعناصر تحكم بديهية وميزات متعددة الاستخدامات. مثالية لعشاق التصوير الفوتوغرافي ، توفر هذه الكاميرات تركيزا بؤريا تلقائيا موثوقا به وشاشات لمس متغيرة الزوايا وتسجيل فيديو عالي الدقة أو 4K.
اتصال
القرار (MP)
دقة
توفر سلسلة EOS DSLR من Canon صورا عالية الجودة وتركيزا بؤريا تلقائيا سريعا وتعدد الاستخدامات، مما يجعلها مثالية لكل من التصوير الفوتوغرافي وإنتاج الفيديو.
اتصال
القرار (MP)
دقة
تجمع سلسلة EOS M Mirrorless Series من Canon بين التصميم صغير الحجم والأداء الشبيه بكاميرا DSLR. تتميز هذه الكاميرات بعدسات قابلة للتبديل وضبط تلقائي للصورة سريع ومستشعرات صور عالية الجودة ، وهي رائعة للمسافرين ومنشئي المحتوى الذين يبحثون عن قابلية النقل دون التضحية بجودة الصورة.
اتصال
القرار (MP)
دقة
توفر الفئة PowerShot Series من Canon كاميرات صغيرة الحجم وسهلة الاستخدام للرماة العاديين والمتحمسين. مع الطرز التي تتراوح من كاميرات التأشير والتصوير البسيطة إلى كاميرات التكبير المتقدمة ، فإنها توفر الراحة وجودة الصورة القوية وميزات مثل تثبيت الصورة والفيديو بدقة 4K.
اتصال
القرار (MP)
دقة
تم تصميم الكاميرات المقربة والمحمولة باليد من Canon للتصوير الفوتوغرافي والفيديو التفصيلي عن قرب. فهي صغيرة الحجم وسهلة الاستخدام ، وتوفر تركيزا دقيقا وتصويرا عالي الدقة وإمكانيات ماكرو متعددة الاستخدامات - مثالية لمدونات الفيديو وتصوير المنتجات واللقطات المقربة الإبداعية.
اتصال
القرار (MP)
دقة


